%%%%%%%%%%%%%%%%%%%%%%%%%%%%%%%%%%%%%%%%%
% This template has been downloaded from:
% http://www.LaTeXTemplates.com
% CC BY-NC-SA 3.0 (http://creativecommons.org/licenses/by-nc-sa/3.0/)
%%%%%%%%%%%%%%%%%%%%%%%%%%%%%%%%%%%%%%%%%
%----------------------------------------------------------------------------------------
%%%%%%%%%%%%%%%%%%%%%%%%%%%%%%%%%%%%%%%%%
% This template has been downloaded from:
% http://www.LaTeXTemplates.com
% CC BY-NC-SA 3.0 (http://creativecommons.org/licenses/by-nc-sa/3.0/)
%%%%%%%%%%%%%%%%%%%%%%%%%%%%%%%%%%%%%%%%%
%----------------------------------------------------------------------------------------
%----------------------------------------------------------------------------------------
% The Beamer class comes with a number of default slide themes
% which change the colors and layouts of slides. Below this is a list
% of all the themes, uncomment each in turn to see what they look like.
% As well as themes, the Beamer class has a number of color themes
% for any slide theme. Uncomment each of these in turn to see how it
% changes the colors of your current slide theme.
%\usecolortheme{albatross}
%\usecolortheme{seahorse}
%\usecolortheme{wolverine}
%\setbeamertemplate{footline} % To remove the footer line in all slides uncomment this line
%\setbeamertemplate{footline}[page number] % To replace the footer line in all slides with a simple slide count uncomment this line
%\setbeamertemplate{navigation symbols}{} % To remove the navigation symbols from the bottom of all slides uncomment this line
\usepackage{graphicx} % Allows including images
\usepackage{booktabs} % Allows the use of \toprule, \midrule and \bottomrule in tables
%----------------------------------------------------------------------------------------
%----------------------------------------------------------------------------------------
\title[Short title]{Full Title of the Talk} % The short title appears at the bottom of every slide, the full title is only on the title page
\author{John Smith} % Your name
\institute[UCLA] % Your institution as it will appear on the bottom of every slide, may be shorthand to save space
University of California \\ % Your institution for the title page
\textit{john@smith.com} % Your email address
\date{\today} % Date, can be changed to a custom date
\titlepage % Print the title page as the first slide
\frametitle{Overview} % Table of contents slide, comment this block out to remove it
\tableofcontents % Throughout your presentation, if you choose to use \section{} and \subsection{} commands, these will automatically be printed on this slide as an overview of your presentation
%----------------------------------------------------------------------------------------
%----------------------------------------------------------------------------------------
%------------------------------------------------
\section{First Section} % Sections can be created in order to organize your presentation into discrete blocks, all sections and subsections are automatically printed in the table of contents as an overview of the talk
%------------------------------------------------
\subsection{Subsection Example} % A subsection can be created just before a set of slides with a common theme to further break down your presentation into chunks
\frametitle{Paragraphs of Text}
Sed iaculis dapibus gravida. Morbi sed tortor erat, nec interdum arcu. Sed id lorem lectus. Quisque viverra augue id sem ornare non aliquam nibh tristique. Aenean in ligula nisl. Nulla sed tellus ipsum. Donec vestibulum ligula non lorem vulputate fermentum accumsan neque mollis.\\~\\
Sed diam enim, sagittis nec condimentum sit amet, ullamcorper sit amet libero. Aliquam vel dui orci, a porta odio. Nullam id suscipit ipsum. Aenean lobortis commodo sem, ut commodo leo gravida vitae. Pellentesque vehicula ante iaculis arcu pretium rutrum eget sit amet purus. Integer ornare nulla quis neque ultrices lobortis. Vestibulum ultrices tincidunt libero, quis commodo erat ullamcorper id.
%------------------------------------------------
\frametitle{Bullet Points}
\item Lorem ipsum dolor sit amet, consectetur adipiscing elit
\item Aliquam blandit faucibus nisi, sit amet dapibus enim tempus eu
\item Nulla commodo, erat quis gravida posuere, elit lacus lobortis est, quis porttitor odio mauris at libero
\item Nam cursus est eget velit posuere pellentesque
\item Vestibulum faucibus velit a augue condimentum quis convallis nulla gravida
%------------------------------------------------
\frametitle{Blocks of Highlighted Text}
Lorem ipsum dolor sit amet, consectetur adipiscing elit. Integer lectus nisl, ultricies in feugiat rutrum, porttitor sit amet augue. Aliquam ut tortor mauris. Sed volutpat ante purus, quis accumsan dolor.
Pellentesque sed tellus purus. Class aptent taciti sociosqu ad litora torquent per conubia nostra, per inceptos himenaeos. Vestibulum quis magna at risus dictum tempor eu vitae velit.
Suspendisse tincidunt sagittis gravida. Curabitur condimentum, enim sed venenatis rutrum, ipsum neque consectetur orci, sed blandit justo nisi ac lacus.
%------------------------------------------------
\frametitle{Multiple Columns}
\begin{columns}[c] % The "c" option specifies centered vertical alignment while the "t" option is used for top vertical alignment
\column{.45\textwidth} % Left column and width
\column{.5\textwidth} % Right column and width
Lorem ipsum dolor sit amet, consectetur adipiscing elit. Integer lectus nisl, ultricies in feugiat rutrum, porttitor sit amet augue. Aliquam ut tortor mauris. Sed volutpat ante purus, quis accumsan dolor.
%------------------------------------------------
%------------------------------------------------
\textbf{Treatments} & \textbf{Response 1} & \textbf{Response 2}\\
Treatment 1 & 0.0003262 & 0.562 \\
Treatment 2 & 0.0015681 & 0.910 \\
Treatment 3 & 0.0009271 & 0.296 \\
%------------------------------------------------
\begin{theorem}[Mass--energy equivalence]
%------------------------------------------------
\begin{frame}[fragile] % Need to use the fragile option when verbatim is used in the slide
\begin{example}[Theorem Slide Code]
\begin{theorem}[Mass--energy equivalence]
\end{frame}\end{verbatim}
%------------------------------------------------
Uncomment the code on this slide to include your own image from the same directory as the template .TeX file.
%\includegraphics[width=0.8\linewidth]{test}
%------------------------------------------------
\begin{frame}[fragile] % Need to use the fragile option when verbatim is used in the slide
An example of the \verb|\cite| command to cite within the presentation:\\~
This statement requires citation \cite{p1}.
%------------------------------------------------
\begin{thebibliography}{99} % Beamer does not support BibTeX so references must be inserted manually as below
\bibitem[Smith, 2012]{p1} John Smith (2012)
\newblock Title of the publication
\newblock \emph{Journal Name} 12(3), 45 -- 678.
%------------------------------------------------
\Huge{\centerline{The End}}
%----------------------------------------------------------------------------------------
%----------------------------------------------------------------------------------------
% The Beamer class comes with a number of default slide themes
% which change the colors and layouts of slides. Below this is a list
% of all the themes, uncomment each in turn to see what they look like.
% As well as themes, the Beamer class has a number of color themes
% for any slide theme. Uncomment each of these in turn to see how it
% changes the colors of your current slide theme.
%\usecolortheme{albatross}
%\usecolortheme{seahorse}
%\usecolortheme{wolverine}
%\setbeamertemplate{footline} % To remove the footer line in all slides uncomment this line
%\setbeamertemplate{footline}[page number] % To replace the footer line in all slides with a simple slide count uncomment this line
%\setbeamertemplate{navigation symbols}{} % To remove the navigation symbols from the bottom of all slides uncomment this line
\usepackage{graphicx} % Allows including images
\usepackage{booktabs} % Allows the use of \toprule, \midrule and \bottomrule in tables
%----------------------------------------------------------------------------------------
%----------------------------------------------------------------------------------------
\title[Short title]{Full Title of the Talk} % The short title appears at the bottom of every slide, the full title is only on the title page
\author{John Smith} % Your name
\institute[UCLA] % Your institution as it will appear on the bottom of every slide, may be shorthand to save space
University of California \\ % Your institution for the title page
\textit{john@smith.com} % Your email address
\date{\today} % Date, can be changed to a custom date
\titlepage % Print the title page as the first slide
\frametitle{Overview} % Table of contents slide, comment this block out to remove it
\tableofcontents % Throughout your presentation, if you choose to use \section{} and \subsection{} commands, these will automatically be printed on this slide as an overview of your presentation
%----------------------------------------------------------------------------------------
%----------------------------------------------------------------------------------------
%------------------------------------------------
\section{First Section} % Sections can be created in order to organize your presentation into discrete blocks, all sections and subsections are automatically printed in the table of contents as an overview of the talk
%------------------------------------------------
\subsection{Subsection Example} % A subsection can be created just before a set of slides with a common theme to further break down your presentation into chunks
\frametitle{Paragraphs of Text}
Sed iaculis dapibus gravida. Morbi sed tortor erat, nec interdum arcu. Sed id lorem lectus. Quisque viverra augue id sem ornare non aliquam nibh tristique. Aenean in ligula nisl. Nulla sed tellus ipsum. Donec vestibulum ligula non lorem vulputate fermentum accumsan neque mollis.\\~\\
Sed diam enim, sagittis nec condimentum sit amet, ullamcorper sit amet libero. Aliquam vel dui orci, a porta odio. Nullam id suscipit ipsum. Aenean lobortis commodo sem, ut commodo leo gravida vitae. Pellentesque vehicula ante iaculis arcu pretium rutrum eget sit amet purus. Integer ornare nulla quis neque ultrices lobortis. Vestibulum ultrices tincidunt libero, quis commodo erat ullamcorper id.
%------------------------------------------------
\frametitle{Bullet Points}
\item Lorem ipsum dolor sit amet, consectetur adipiscing elit
\item Aliquam blandit faucibus nisi, sit amet dapibus enim tempus eu
\item Nulla commodo, erat quis gravida posuere, elit lacus lobortis est, quis porttitor odio mauris at libero
\item Nam cursus est eget velit posuere pellentesque
\item Vestibulum faucibus velit a augue condimentum quis convallis nulla gravida
%------------------------------------------------
\frametitle{Blocks of Highlighted Text}
Lorem ipsum dolor sit amet, consectetur adipiscing elit. Integer lectus nisl, ultricies in feugiat rutrum, porttitor sit amet augue. Aliquam ut tortor mauris. Sed volutpat ante purus, quis accumsan dolor.
Pellentesque sed tellus purus. Class aptent taciti sociosqu ad litora torquent per conubia nostra, per inceptos himenaeos. Vestibulum quis magna at risus dictum tempor eu vitae velit.
Suspendisse tincidunt sagittis gravida. Curabitur condimentum, enim sed venenatis rutrum, ipsum neque consectetur orci, sed blandit justo nisi ac lacus.
%------------------------------------------------
\frametitle{Multiple Columns}
\begin{columns}[c] % The "c" option specifies centered vertical alignment while the "t" option is used for top vertical alignment
\column{.45\textwidth} % Left column and width
\column{.5\textwidth} % Right column and width
Lorem ipsum dolor sit amet, consectetur adipiscing elit. Integer lectus nisl, ultricies in feugiat rutrum, porttitor sit amet augue. Aliquam ut tortor mauris. Sed volutpat ante purus, quis accumsan dolor.
%------------------------------------------------
%------------------------------------------------
\textbf{Treatments} & \textbf{Response 1} & \textbf{Response 2}\\
Treatment 1 & 0.0003262 & 0.562 \\
Treatment 2 & 0.0015681 & 0.910 \\
Treatment 3 & 0.0009271 & 0.296 \\
%------------------------------------------------
\begin{theorem}[Mass--energy equivalence]
%------------------------------------------------
\begin{frame}[fragile] % Need to use the fragile option when verbatim is used in the slide
\begin{example}[Theorem Slide Code]
\begin{theorem}[Mass--energy equivalence]
\end{frame}\end{verbatim}
%------------------------------------------------
Uncomment the code on this slide to include your own image from the same directory as the template .TeX file.
%\includegraphics[width=0.8\linewidth]{test}
%------------------------------------------------
\begin{frame}[fragile] % Need to use the fragile option when verbatim is used in the slide
An example of the \verb|\cite| command to cite within the presentation:\\~
This statement requires citation \cite{p1}.
%------------------------------------------------
\begin{thebibliography}{99} % Beamer does not support BibTeX so references must be inserted manually as below
\bibitem[Smith, 2012]{p1} John Smith (2012)
\newblock Title of the publication
\newblock \emph{Journal Name} 12(3), 45 -- 678.
%------------------------------------------------
'''이 프로젝트는 종료되었습니다.'''
\begin{frame}
\Huge{\centerline{The End}}
\end{frame}
== TnXTeX is NOT... ==
TnXTeX은 Windows에서 동작하는 간이 텍 환경입니다. 테스트용, 교육용, 휴대용의 목적으로 활용할 수 있습니다.
* TnXTeX은 "설치"하지 않습니다. 일시적으로 압축을 풀어 실행하고 지울 수 있는 portable TeX입니다.
* TnXTeX은 [wiki:"TeX Live"]를 기반으로 만들어졌지만 [wiki:"TeX Live"]가 아닙니다.
* 텍의 본격적인 사용을 원하신다면 ''크고 아름다운'' [wiki:"TeX Live"]를 설치하십시오.
'''[wiki:"TeX Live"]에 대한 설치 안내가 필요하신 분은 [wiki:설치] 페이지를 보십시오.'''
%----------------------------------------------------------------------------------------
----
\end{document}
* [http://ftp.ktug.org/KTUG/TnXTeX/tnxtex-1.4.5.exe tnxtex-1.4.5 (180M) ]
* [http://ftp.ktug.org/KTUG/TnXTeX/tnxtex-1.4.4.exe tnxtex-1.4.4 (160M) ]
** TnXTeX를 위한 화일 보관 및 다운로드를 제공하여 주신 http://kldp.net/ 의 서비스가 2017-02-28 부로 종료되어 ftp.ktug.org로 옮겼습니다.
* 1.4.5 : maintenance update
* 1.4.4 : xetex/luatex binaries update
* 1.4.3-5 : TeXworks tools, kotexindy, latexmk
* 1.4.3-3 : luaotftool-blacklist.cnf, texmf.cnf (for user), xdvipdfmx/xetex binaries, hcr-lvt...
* 1.4.3-1 : Equation Editor 오동작 수정.
* 1.4.3 : multimarkdown을 포함합니다.
* pstricks [http://ftp.ktug.org/KTUG/TnXTeX/tnxtex-all-pstricks.exe tnxtex-all-pstricks.exe (25M)]
* TnXTeX의 pstricks는 dvips 없이 xelatex으로만 실행됩니다. lualatex은 원래 pstricks를 처리하지 못합니다. 그래도 pstricks가 불가결하신 분만 추가로 설치하십시오.
* texmaker [http://ftp.ktug.org/KTUG/TnXTeX/tnxtex-all-texmaker.exe tnxtex-all-texmaker.exe ]
* '''xdvipdfmx 최신 버전''' (Source Han Sans와 같은 CID keyed font를 정상적으로 처리합니다.)
* '''한글 파일명''' 사용 가능 (단, synctex은 동작하지 않습니다.)
* LuaLaTeX 실행 파일 (단, nanumtype1이 없으므로 한글 폰트를 지정해야 합니다.)
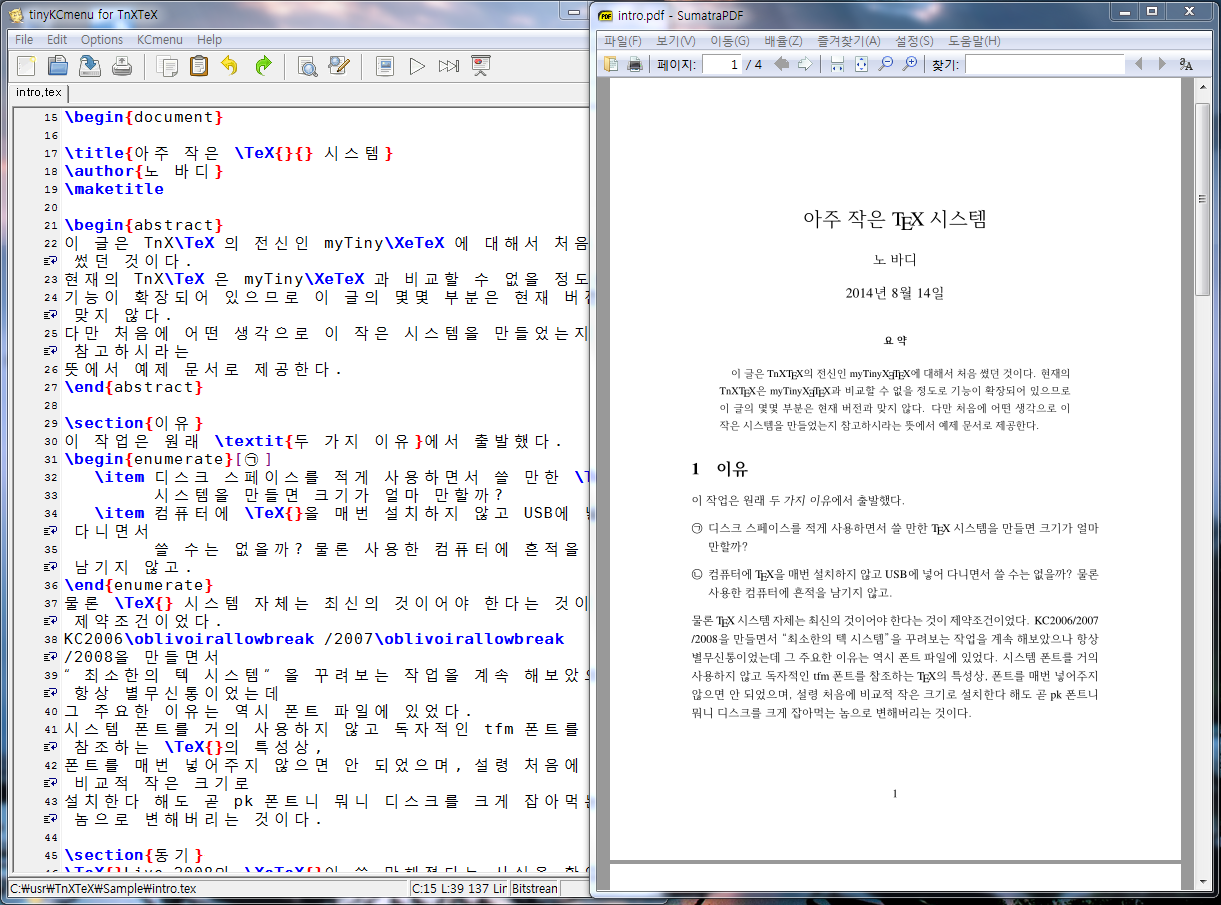
* TeXworks, tinyKCmenu+sumatrapdf
* TeXworks 한글 사용 환경 (spellchecker, templates, XeLaTeX-shell command, ...)
* 다운받은 파일은 자동 풀림 압축파일입니다.
* '''주의''': 압축을 해제할 때 폴더 경로에 빈 공백이 없도록 해 주십시오. 디폴트인 {{{C:\usr\TnXTeX}}}를 추천합니다. (USB라면) 예컨대 {{{E:\ }}}와 같이 선택합니다.
* Windows 7이나 8의 호환성 관리자가 "이 프로그램이 제대로 설치되지 않았을 수 있습니다"라는 메시지를 보여주면 "제대로 설치되었다"고 승인하고 넘어가면 됩니다. 단순 압축파일이기 때문에 이런 메시지를 보여줍니다.
* 압축을 푼 폴더의 tnxtex14.exe를 더블 클릭하여 TnXTeX 세션을 시작하십시오.
* 세션 시작 과정에서 나오는 명령창을 강제로 닫지 마십시오.
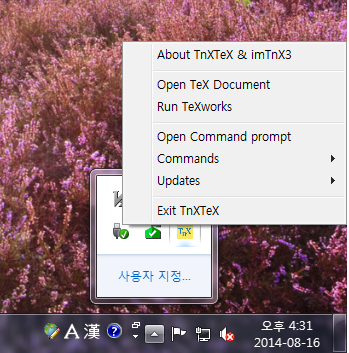
* 모든 TnXTeX action은 트레이 메뉴에서 시작하여야 합니다.
* attachment:tnxtextray.png
* TnXTeX menu에서 update를 제외하고 다른 것은 정상 동작합니다. (update는 disabled)
* euc-kr 인코딩 파일을 utf-8으로 변환하는 명령행 배치파일 euc2utf가 제공됩니다.
* LuaLaTeX의 최초 실행시 폰트 캐시를 만드는 데 시간이 걸립니다. TnXTeX은 실행시에 xelatex을 위한 폰트 캐시 작업만 하고 lualatex을 위해서는 캐시를 만들지 않기 때문입니다.
* lualatex을 위한 폰트 캐시를 강제하려면 luaotfload-tool --update 명령으로 하십시오. (mkluatexfontdb 명령이 없습니다.)
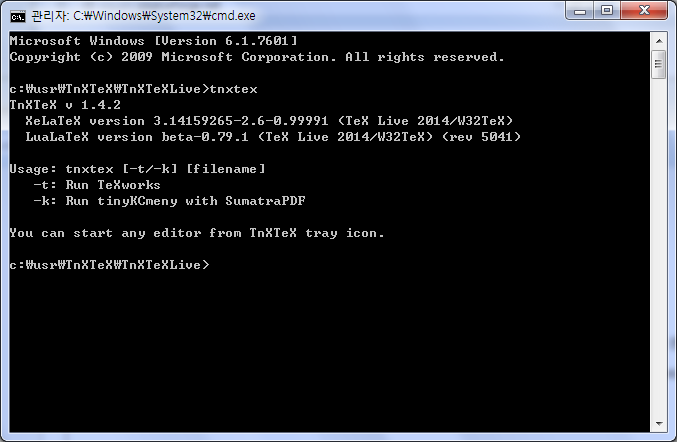
* TnXTeX menu -> Command Line상에서 tnxtex 명령으로 에디터를 열 수 있습니다.
* TnXTeX 현재 버전의 xetex은 한글 파일 이름이 가능한 대신 "한글 이름의 폰트 파일"에서 에러를 보일 수 있습니다. 한글 이름으로 된 폰트(예를 들면 "나눔고딕코딩.ttf")를 사용해야 한다면 TnXTeXLive/texmf.cnf 파일을 열어서 다음과 같이 utf8 설정된 부분을 주석처리하십시오. 이 경우 한글 파일 이름을 쓸 수 없습니다.
% command_line_encoding=utf8
* attachment:cmdtnxtex.png?width=500px
* tinykcmenu + sumatrapdf
* attachment:tinysum.png?width=600px
* Source Han Sans (CJK) 폰트 테스트
* attachment:tstsourcehansans.tex.zip
* attachment:tstsourcehansans.pdf
http://faq.ktug.org/faq/TnXTeX
https://www.google.co.kr/search?q=myTinyXeTeX
* [http://ftp.ktug.org/KTUG/TnXTeX/archive/tnxtex-dvd-1.4.3.iso tnxtex-dvd-1.4.3.iso (3.9GB) ] [http://ftp.ktug.org/KTUG/TnXTeX/archive/tnxtex-dvd-1.4.3.iso.md5 md5]
* mount the iso, and read README.txt
* download [http://ftp.ktug.org/KTUG/TnXTeX/archive/tnxtex-dvd-1.4.4-update.exe tnxtex-dvd-1.4.4-update.exe ]
* execute downloaded .exe file to the same folder
* install additional texlive binaries -> tlmgr update --all --self
* 100M를 넘지 않는 TnXTeX. (초심에 충실한...)
* [http://ftp.ktug.org/KTUG/TnXTeX/archive/tnxtex-esse-1.4.4.exe tnxtex-esse-1.4.4.exe (94M) ]
* LuaLaTeX, HCR-LVT 폰트 등은 제외되어 있음.
* attachment:tnxtexdoc.zip
 [PNG image (187.24 KB)]
 [PNG image (46.17 KB)]
 [PNG image (275.63 KB)]
 tstsourcehansans.tex.zip (2.14 KB)
 tstsourcehansans.pdf (152.36 KB)
 tnxtexdoc.zip (700.78 KB)


